[Python] Flask 기초 사용법

기본 어플리케이션
from flask import Flask
app = Flask(__name__)

@app.route('/')
def hello_world():
    return 'Hello World!'

if __name__ == '__main__':
    app.run()
위와 같은 코드를 입력하면 Hello World!를 출력하는 단순한 웹 어플리케이션을 만들 수 있다.
app = Flask(__name__)을 통해 Flask class의 인스턴스를 생성한다. 인자로는 모듈이나 패키지의 이름을 넣는다.
route()데코레이터를 사용해서 Flask에게 어떤 URL이 우리가 작성한 함수를 실행시키는지 알려줄 수 있다.
마지막 줄의 app.run()을 통해 개발한 어플리케이션을 로컬서버로 실행한다.
if __name__ == '__main__'을 통해 우리가 실행한 서버가 현재 동작되는 유일한 서버라는 것을 보장할 수 있다.

실행시켜보면 터미널에 위와같은 문구를 볼 수 있고 http://127.0.0.1:5000 으로 이동해보면 아래와 같은 웹을 확인할 수 있다.

Routing
from flask import Flask

app = Flask(__name__)

@app.route('/')
def hello_world():
    return 'Hello, world!'

@app.route('/<user>')
def user(user):
    return f'Hello, {user}!'

@app.route('/user/<username>')
def show_user_profile(username):
    return 'User %s' % username

@app.route('/post/<int:post_id>')
def show_post(post_id):
    return 'Post %d' % post_id

if __name__=='__main__':
    app.run()
위에서 본 것 처럼 route()데코레이터는 함수와 URL을 연결해준다.
위 코드에서 @app.route('/')는 Flask에게 바로 밑의 hello_world()함수를 실행시키라고 알려준다. http://127.0.0.1:5000/ 에 들어간다면 hello_world()의 결과인 Hello World!가 출력된 것을 볼 수 있을 것이다.
URL을 동적으로 구성할 수도 있다. URL의 변수부분을 추가하기 위해서 <variable_name>이렇게 URL에 특별한 형식으로 표시해야한다. 이 부분은 함수의 키워드 인자로써 넘어가게 된다.
@app.route('/<user>') 부분

@app.route('/user/<username>') 부분

@app.route('/post/<int:post_id>') 부분

Rendering Templates
from flask import Flask

app = Flask(__name__)

@app.route('/')
def hello_world():
    return '<h1>Hello, World!</h1>'

if __name__=='__main__':
    app.run()
이런식으로 python 파일에서 직접 html 코드를 입력할 수도 있지만 render_template()메소드를 이용해 템플릿을 렌더링해줄 수도 있다.
hello.html
<!DOCTYPE html>
<html lang="en">
<head>
    <meta charset="UTF-8">
    <meta http-equiv="X-UA-Compatible" content="IE=edge">
    <meta name="viewport" content="width=device-width, initial-scale=1.0">
    <title>Hello from Flask</title>
</head>
<body>
    <h1>HTML template</h1>
</body>
</html>
user.html
<!DOCTYPE html>
<html lang="en">
<head>
    <meta charset="UTF-8">
    <meta http-equiv="X-UA-Compatible" content="IE=edge">
    <meta name="viewport" content="width=device-width, initial-scale=1.0">
    <title>User from Flask</title>
</head>
<body>
    <h1>hello {{user}}</h1>
</body>
</html>
main.py
from flask import Flask, render_template

app = Flask(__name__)

@app.route('/')
def hello_world():
    return render_template('hello.html')

@app.route('/user/<username>')
def user(username):
    return render_template('user.html', user=username)


if __name__=='__main__':
    app.run()
render_template()메소드를 사용하기 위해선 템플릿 이름과 템플릿에 보여질 키워드 인자를 넘겨주면 된다. 그러면 Flask는 templates 폴더에서 템플릿을 찾고 그 템플릿을 렌더링해준다. 대신 그 템플릿은 꼭 templates 폴더 안에 존재해야 한다.
return render_template('hello.html') 부분

return render_template('user.html', user=username) 부분
URL을 통해 받은 키워드 인자 username을 user.html 템플릿에 user로 넘겨주고 있다.

URL의 query argument에 접근하기
hello.html
<!DOCTYPE html>
<html lang="en">
<head>
    <meta charset="UTF-8">
    <meta http-equiv="X-UA-Compatible" content="IE=edge">
    <meta name="viewport" content="width=device-width, initial-scale=1.0">
    <title>Hello from Flask</title>
</head>
<body>
    <form action= "/user" method= "get">
        <input placeholder="input your name" name="name"/>
        <button>click</button>
    </form>

</body>
</html>
/에서 위의 hello.html을 렌더링 한다면 웹의 /주소에서는 아래와 같이 보여질 것이고 input에 넣는 값이 url의 parameter로 들어오게 된다.


input에 jihee를 입력하였다면 url에 /user?name=jihee 이런식으로 들어가게 된다.
만약 위의 input에 넣은 parameter값을 얻고 싶다면 request.args.get('key')를 이용하면 된다.
from flask import Flask, render_template, request

app = Flask(__name__)

@app.route('/')
def hello_world():
    return render_template('hello.html')

@app.route('/user')
def user():
    name = request.args.get('name')
    return render_template('user.html', name=name)

if __name__=='__main__':
    app.run()
request.args.get('name')은 key이름이 name인 value 값을 가져오게 된다. 위의 input에 jihee를 입력하면 jihee를 가져오고, abcd를 입력하면 abcd를 가져오게 되고 이를 이용할 수 있다.
나는 입력된 것을 포함해 다시 출력해주고 싶어서 request.args.get('name')으로 가져온 값을 다시 render_template()의 인자로 넘었고 user.html에서 이 인자를 포함해 hello {{name}}을 출력해 주었다.
user.html
<!DOCTYPE html>
<html lang="en">
<head>
    <meta charset="UTF-8">
    <meta http-equiv="X-UA-Compatible" content="IE=edge">
    <meta name="viewport" content="width=device-width, initial-scale=1.0">
    <title>User from Flask</title>
</head>
<body>
    <h1>hello {{name}}</h1>
</body>
</html>
redirect
사용자가 다른 엔드포인트로 redirect하기 위해서는 redirect()함수를 사용할 수 있다.
hello.html
<!DOCTYPE html>
<html lang="en">
<head>
    <meta charset="UTF-8">
    <meta http-equiv="X-UA-Compatible" content="IE=edge">
    <meta name="viewport" content="width=device-width, initial-scale=1.0">
    <title>Hello from Flask</title>
</head>
<body>
    <form action= "/user" method= "get">
        <input placeholder="input your name" name="name"/>
        <button>click</button>
    </form>

</body>
</html>
main.py
from flask import Flask, render_template, request, redirect, url_for
app = Flask(__name__)

@app.route('/')
def hello_world():
    return render_template('hello.html')

@app.route('/user')
def user():
    name = request.args.get('name')
    if name:
        return render_template("user.html",name=name)
    else:
        return redirect('/error')

@app.route('/error')
def erorr():
    return "ERORR!"

if __name__=='__main__':
    app.run()
위 코드에서는 만약 사용자가 아무것도 입력하지 않아 name이 None이 된다면 /error 로 redirect하도록 한 것이다.
만약 사용자가 아무것도 입력하지 않는다면 아래와 같은 화면을 볼 수 있다.

send_file()
client에게 file을 보내고 싶다면(사용자가 file을 다운받을 수 있도록하고싶다면) send_file()을 이용하면 된다. 함수인자로는 filename or fp, attachment_filename, as_attachment를 보내주면 된다. filename or fp에는 보내고 싶은 파일의 이름이나 파일경로, attachment_filename은 보내고 싶은 파일의 이름과 다르게 파일을 첨부하고 싶을 때 첨부하고 싶은 파일의 이름, as_attachment는 파일을 첨부할지 여부이다.
hello.html
<!DOCTYPE html>
<html lang="en">
<head>
    <meta charset="UTF-8">
    <meta http-equiv="X-UA-Compatible" content="IE=edge">
    <meta name="viewport" content="width=device-width, initial-scale=1.0">
    <title>Hello from Flask</title>
</head>
<body>
    <form action= "/user" method= "get">
        <input placeholder="input your name" name="name"/>
        <button>click</button>
    </form>

</body>
</html>
user.html
<!DOCTYPE html>
<html lang="en">
<head>
<meta charset="UTF-8">
<meta http-equiv="X-UA-Compatible" content="IE=edge">
<meta name="viewport" content="width=device-width, initial-scale=1.0">
<title>User from Flask</title>
</head>
<body>
<h1>hello {{name}}</h1>
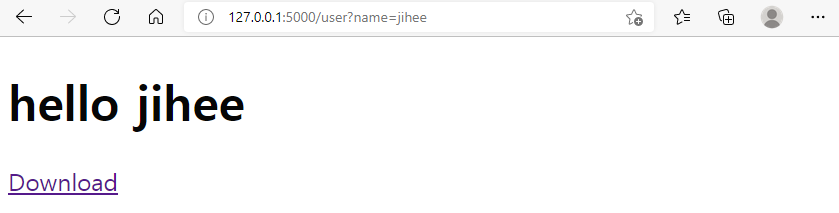
<a href="/download?name={{name}}">Download</a>
</body>
</html>main.py
from fileinput import close
from flask import Flask, render_template, request, redirect, send_file
app = Flask(__name__)

@app.route('/')
def hello_world():
    return render_template('hello.html')

@app.route('/user')
def user():
    name = request.args.get('name')
    if name:
        return render_template("user.html",name=name)
    else:
        return redirect('/error')

@app.route('/download')
def download():
    name = request.args.get('name')
    file = open("name.txt", mode="w")
    file.write(f"username is {name}")
    file.close()
    return send_file("./name.txt", attachment_filename=f"{name}.txt", as_attachment=True)


@app.route('/error')
def erorr():
    return "ERORR!"

if __name__=='__main__':
    app.run()
/user에서 download 링크를 클릭하면 실행되는 download함수는 query argument 중 key값이 name인 것을 가져와 name.txt 파일에 "username is {name}"을 쓰고 그 name.txt 파일을 {name}.txt 파일로 보내게 된다.


<참조>
https://flask-docs-kr.readthedocs.io/ko/latest/quickstart.html
빠르게 시작하기 — Flask 0.11-dev documentation
웹 어플리케이션에 있어서 클라이언트에서 서버로 보내는 데이타를 처리하는 것은 중요한 일이다. Flask에서 이 정보는 글로벌한 request 객체에 의해 제공된다. 여러분이 파이썬 경험이 있다면,
flask-docs-kr.readthedocs.io